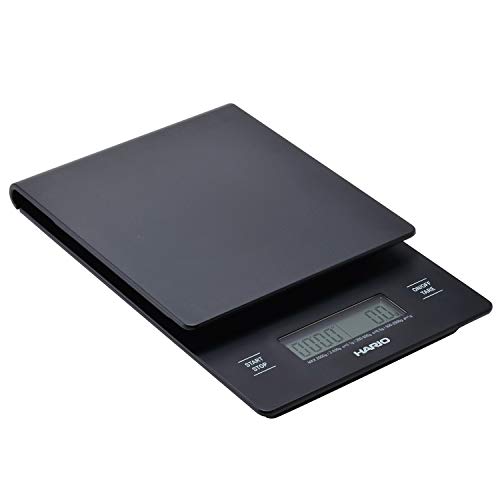
How To Grind Coffee For Aeropress? 5-Minute Read

Disclosure: This post contains affiliate links and I may earn a small commission (at no extra cost to you) if you click through and make a purchase. Thanks in advance – I really appreciate it!

There are many reasons why coffee connoisseurs love the AeroPress coffee brewer, but I purchased my first AeroPress because it’s one of the most approachable & easiest manual coffee brewing methods.

But after purchasing my brewer, the first thing I wanted to know was the best Aeropress grind size that can produce the most balanced cup of delicious coffee.

Key Takeaways:

How fine should coffee grounds be for AeroPress?

The Aeropress coffee brewing method calls for a medium-fine to fine coffee grind size. You can also use preground drip coffee from the grocery store but you may want to use slightly more coffee or let it steep for 2-3 minutes to reach the same strength it would reach using a finer grind. 

The AeroPress can be a coffee brewer of intrigue and experimentation. It has the ability to brew great coffee with little care. If you want to brew a perfect AeroPress cup of coffee each time then there are several factors such as the Aeropress coffee to water ratio, Aeropress grinder settings, etc. that you should be aware of. This article will guide you in mastering every aspect of AeroPress coffee brewing.

How Fine To Grind Coffee For Aeropress

You may be brewing coffee every day multiple times but have you ever stopped and wondered why we use ground coffee as opposed to just whole beans? Or why does the size of the coffee grounds matter?

The perfect coffee grind size is the backbone of great coffee and each coffee brewing method uses a different grind size.

You can not just choose one grind size and use it for anything, some grinds are best suited for certain coffee makers.

The best Aeropress grind size is somewhere between medium-fine which is used for drip coffee to fine grind size used for making espresso.

The ground coffee should feel like sugar or salt when you rub it between your fingers.

But if you are using a darker roast then you may prefer to increase the amount of coffee used and coarsen the grind. 

As I mentioned at the beginning of this article, you can also use store-bought pre-ground coffee for Aeropress but make sure that you brew it for a slightly longer duration (2-3 minutes) and use a bit more coffee grounds than you would generally use for brewing Aeropress coffee.

We do this to make sure the coffee turns out to be of the same strength as the Aeropress coffee which is brewed using fine espresso grinds.

Why Should You Grind Coffee For AeroPress

Can you believe it – 100 years ago coffee brewing method involved boiling the whole roasted beans in hot water for hours while agitating them. 

With some patience and lots of time, you’d eventually end up with a bitter, high-caffeine, coffee solution.

Luckily for us, a more efficient method to extract the goodies from the coffee beans was invented. 

By grinding the coffee beans you help the water to extract efficiently the solubles that are responsible for the taste and aroma in coffee.

When you grind a coffee bean, the total surface area of the bean is increased. As a result, the extraction efficiency is greatly increased. Why? 

Because there’s more surface area for the hot water to act upon and from which to extract the flavor components.

Grinding coffee beans increases their surface area, which causes the beans to lose their flavor more rapidly than they would if they were left as whole beans. 

When you grind coffee even moisture in the air can cause the flavorful, water-soluble parts of the coffee bean to dissolve. 

In addition, oxidation, which occurs naturally, is sped up once the surface area of the coffee bean is reduced through grinding.

This is the reason why I and all the coffee connoisseurs and professionals recommend grinding your coffee fresh just before brewing your cup of joe.

The problem with pre-ground coffee bought from the grocery store is that it has been ground hundreds of miles from your home, stored who knows where for who knows how long, shipped, and then left to sit in a bag in your fridge or cabinet has been given plenty of time to lose its complex flavors.  

That’s okay if you are just drinking it for the caffeine hit, but if you really want a tasty cup-o-joe, you’ve got to be willing to do a little of the work yourself.

What number do I grind for AeroPress coffee?

Importance of the AeroPress Grind Size

No matter your brew method, coffee-making involves extracting flavor (and caffeine) from coffee grounds. 

The finer you grind your coffee beans, the more you increase the exposed surface area of the grounds, resulting in faster extraction. 

That’s why coffee for Aeropress is ground medium-fine since the water from an AeroPress coffee brewer is made to pass quickly by applying manual pressure through the grounds. 

Cold-brew, on the other hand, is made with coarse-ground coffee, since this cold-extraction method allows the coffee to sit with the water for a much longer period of time (several hours, compared to AeroPress’s one and a half minutes).

If the contact time is too high or the grind is too fine, it will result in an over-extracted brew that can be bitter. If the grind is too coarse or the contact time is too short, the coffee will turn out weak.

Finding the proper balance between the two will help in producing the best cup of coffee possible.

If your coffee is mouth-puckeringly sour? Your grind size is too coarse – go finer. And if it’s a bitter brew? You have the opposite issue, try grinding coarser.

But your personal preferences will always determine the ideal coffee recipe. So too will the coffee you’re brewing: depending on the origin, variety, processing method, roast profile, and more, you may want to highlight different characteristics. 

Dark roasts, for example, are more soluble and so you might use a slightly coarser grind.

What is the Best Aeropress Coffee to Water Ratio?

The best coffee to water ratio for AeroPress coffee brewing is 1:14. In other words, to make a cup of coffee, use 250 ml of water and 18 grams of medium-fine to finely ground coffee. Water temperature should be 195°F to 205°F and total brew time should be between 1-1:30 minutes.

Let’s be clear, your ideal AeroPress coffee to water ratio might differ from my recommendations. Everyone is different and likes coffee in their own way, but you can use the above guideline to help you find your perfect ratio.

I recommend experimenting, trying different ratios side-by-side to determine your preferences for different roasts and brewing methods.

In general, though, you probably don’t want to go stronger than 1:12 for most methods because the results will just be too muddy. And getting lower than 1:20 or so is going to leave you with watery, bland coffee that is likely too bitter.

Since there aren’t that many ingredients, many people just throw coffee and water together haphazardly and never wonder about the results. One day, the coffee is great. The next day it stinks.

But that isn’t you. You want to fine-tune your process. You want to experiment with the few variables you can control. And that’s where the Aeropress coffee to water ratio comes in.

I highly recommend using a coffee scale to weigh your coffee grinds for a perfect AeroPress coffee to water ratio.

Although, scoops and tablespoons are the most common way to measure coffee. But this eyeballing also isn’t reliable. A tablespoon can differ from person to person and roast to roast.

Instead, you’ll want to measure by weight, which means having a good coffee scale for accurate brewing.

I personally use the Hario V60 Drip Coffee Scale. It’s a reliable device that was designed for manual brewing. It has all you need to pour a perfectly accurate Aeropress coffee, from a tare function to a timer. You can measure weight and brew time simultaneously, as both indicators are visible on the display. 

The scale is very easy to use with its two clearly labeled buttons flanking the LCD, and it has an auto-off function that will kick in after five minutes of inactivity to save battery life.

For the best results, you should weigh your water too. This might seem weird for some folks because we tend to think of water and other liquids in terms of volume.

Fortunately, water converts easily. One milliliter of water weighs one gram. Simple. 

While brew time, temperature, and grind will all affect coffee extraction in an Aeropress brewer. 

The brew ratio does as well. Too much coffee, and you’ll likely have an under-extracted drink. Not enough, and it will be over-extracted, which isn’t good either.

Grinder Settings For Aeropress Brewing

Below is a table with grinder settings for AeroPress brewing for the popular burr grinders such as Encore, Breville, Cuisinart & more. I apologize in advance if you don’t find your grinder on this list. I have listed a few decent burr grinders in the next section. So don’t forget to check it out.

GrindersGrind Setting
Baratza Encore4 – 23
Baratza Virtuoso4 – 23
Baratza Vario1 – 6
Capresso Infinity2 – 9
Cuisinart Supreme Grind2 – 10
Bodum Bistro1 – 8
OXO Brew Burr Grinder1 – 8
Hario V604 – 25
KRUPS Burr Grinder2– 10

How To Make AeroPress Coffee

There are two primary methods that people use to brew coffee with the AeroPress: normal and inverted.

With the normal method, you place the filter cap on the brewing chamber and set it filter-down on top of a mug. After pouring the water onto the coffee grounds and letting it steep, you insert the plunger and press down.

This method was the intended process, but it is not favored anymore because it allows some water to drain into the mug before it has achieved a balanced extraction.

The inverted method is much better as the entire device is flipped over, and using this method allows the coffee grounds to be fully immersed in the water before brewing, making for a more consistent cup.

What You’ll Need:

  • Aeropress coffeemaker
  • Aeropress coffee filters
  • Coffee grinder
  • Electric gooseneck kettle
  • Mug
  • Timer (Optional)
  • Scale (Optional)

Step 1: Heat the water. Bring 250ml water to a boil then let it cool for about 1 minute. (You’re aiming for something in between 175°F and 195°F.)

Step 2: Grind the beans. Measure out 18 grams of coffee beans (about 3.5 tablespoons) and grind until fine.

Step 3: Assemble the AeroPress by putting the plunger in the chamber. Flip upside-down but don’t put the cap or filter on.

Step 4: Add your ground coffee. Be careful not to spill any grounds into the ring-shaped gutter at the top of the AeroPress.

Step 5: Pour in the water. Add hot water until the chamber is almost full. Use a spoon to stir once. Steep for one minute.

Step 6: Put on the cap. Place a paper filter in the cap and screw tightly onto the chamber.

Step 7: Flip over the brewer. Quickly and carefully flip the full AeroPress over so the cap is down, and place on a mug or pitcher.

Step 8: Press the plunger. Carefully push the inner chamber down to brew your coffee. Take thirty to forty seconds to press down the plunger. Stop when you hear air being forced through the filter.

Note:  If the pushing feels too easy, your grind is likely too coarse; if it’s very hard to push, chances are the grind is too fine. Your coffee is fully brewed once it begins to make a hissing sound. This means there is no more water to push through the device.

Written by:
Amit Gupta
Amit Gupta

Hi, my name is Amit Gupta, and I am the owner and contributor at Cafeish. My obsession with coffee started when I received my first French press as a gift almost ten years ago. Since then, my love of coffee – and the number of coffee gadgets I own – has grown considerably.

More about me...
Most Popular
ABOUT US

We are a team of coffee affcianados with experience and expertise in making world renowned coffee. In fact, preparing the best coffee ever with a fluffy top reminds us of magic, with secrets of how to achieve each particular effect. Making coffee is not our only hobby, we always keep our ears open as to what’s happening around and what scientists and manufacturers produce for consumers. It’s not an easy task to do – it’s rather time consuming. Hence, Caféish website was launched.

LEGAL DISCLAIMER

Caféish is a participant in the Amazon Services LLC Associates Program, an affiliate advertising program designed to provide a means for sites to earn advertising fees by advertising and linking to Amazon.com. Caféish also participates in affiliate programs with Clickbank and other sites. Caféish is compensated for referring traffic and business to these companies.